Join my colleagues and myself at this year's Oracle OpenWorld. We have three hands-on lab sessions available to attend. These are all focused on integrating Oracle Database 12c with Oracle ZFS Storage Appliance.

HOL2066 - Deploying Oracle Database 12c with Oracle ZFS Storage Appliance

October 26, (Monday) 11:00 AM - Hotel Nikko - Ballroom I
October 28, (Wednesday) 4:15 PM - Hotel Nikko - Ballroom I
HOL2068 - Oracle Database Snapshot and Cloning with Oracle Snap Management Utility

October 26, (Monday) 2:00 PM - Hotel Nikko - Ballroom I
This blog post serves as a followup to Configuring a Basic LDAP Server + Client in Solaris 11. It covers creating self-signed certificates and enabling TLS for secure communication.
1) Enable ldaps:
Edit /lib/svc/method/ldap-olsapd

Remove the following line:
typeset -r SLAPD="/usr/lib/slapd -u ${LDAPUSR} -g ${LDAPGRP} -f ${CONF_FILE}"

Add the following two lines in its place:
typeset -r TYPE="ldap:/// ldaps:///"
typeset -r SLAPD=`/usr/lib/slapd -u ${LDAPUSR} -g ${LDAPGRP} -f ${CONF_FILE} -h "${TYPE}"`
2) Create certificates
# mkdir /etc/openldap/certs
# cd /etc/openldap/certs
# openssl req -x509 -nodes -days 3650 -newkey rsa:2048 \
  -keyout server.key -out server.crt
# chmod 400 server.*
# chown openldap:openldap server.*
3) Update slapd.conf
Add the following lines to the end of /etc/openldap/slapd.conf

TLSCACertificateFile /etc/certs/ca-certificates.crt
TLSCertificateFile /etc/openldap/certs/server.crt
TLSCertificateKeyFile /etc/openldap/certs/server.key
4) Restart LDAP server
# svcadm disable ldap/server
# svcadm enable ldap/server
That's it! Connect to your LDAP server on port 636.
The blog post serves as a follow-up to Deploying MySQL over NFS using the Oracle ZFS Storage Appliance and Deploying MySQL over Fibre Channel / iSCSI using the Oracle ZFS Storage Appliance.
The snapshot and clone features of the Oracle ZFS Storage Appliance provides a convenient mechanism to backup, restore, and fork a MySQL database. A ZFS snapshot is a read-only copy of a file-system that is created instantaneously while initially occupying zero additional space. As the data of a file-system changes, the differences are tracked inside the snapshot. A ZFS clone is a writeable snapshot that can be used to branch off an existing filesystem without modifying the original contents.
Creating a MySQL Snapshot
1. From the MySQL console, disable autocommit:
mysql> set autocommit=0;
2. From the MySQL console, close and lock all database tables with a read lock. This will help to create a consistent snapshot.
mysql> flush tables with read lock;
3. From the ZFS console, create a project-level snapshot of the MySQL project:
zfs:> shares select mysql snapshots snapshot test_snapshot
4. From the MySQL console, unlock all tables to restore the databases to normal operation:
mysql> unlock tables;
Restoring a MySQL Snapshot
1. From the MySQL console, close and lock all database tables with a read lock. This will help to create a consistent snapshot.
mysql> flush tables with read lock;
2. From the ZFS console, rollback the previously created snapshot for each InnoDB share:
zfs:> confirm shares select mysql select innodb-data snapshots select test_snapshot
 rollback
zfs:> confirm shares select mysql select innodb-log snapshots select test_snapshot
 rollback
3. From the MySQL console, unlock all tables to restore the databases to normal operation:
mysql> unlock tables;
Cloning a MySQL Snapshot
1. From the ZFS console, create a clone of both InnoDB snapshots:
zfs:> shares select mysql select innodb-data snapshots select test_snapshot
 clone innodb-data-clone
zfs:shares mysql/innodb-data-clone (uncommitted clone)> commit
zfs:> shares select mysql select innodb-log snapshots select test_snapshot
 clone innodb-log-clone
zfs:shares mysql/innodb-log-clone (uncommitted clone)> commit
2. Mount the newly created shares depending on which protocol you intend to deploy. Refer to the two previous blog posts on this subject.
3. Update /etc/my.cnf with the new InnoDB locations:
innodb_data_home_dir = /path/to/innodb-data-clone
innodb_log_group_home_dir = /path/to/innodb-log-clone
4. Start a new instance of MySQL with the updated my.cnf entries. Any further updates will have no effect on the original database.
Sample REST script for creating a MySQL snapshot
The following python script has been developed to show how to automate this process. It leverages the REST API of the Oracle ZFS Storage Appliance.
#!/usr/bin/python
    import MySQLdb
    import datetime
    import json
    import urllib2

    def zfs_snapshot():
        user = "zfssa_username"
        password = "zfssa_password"
        url = "zfssa_ip_address"
        path = "/api/storage/v1/pools/poolname/projects/mysql/snapshots"
        url = "https:// " + zfs + ":215" + path

        properties = {"name":"MySQL-snapshot"}
        post_data = json.dumps(properties)

        request = urllib2.Request(url, post_data)
        request.add_header("Content-type", "application/json")
        request.add_header("X-Auth-User", user)
        request.add_header("X-Auth-Key", password)
        response = urllib2.urlopen(request)

    def main():
        mysql_server = "localhost"
        mysql_user = "root"
        mysql_pass = ""

        try:
            connection = MySQLdb.connect(host=mysql_server,
            user=mysql_user,passwd=mysql_pass)
        except MySQLdb.OperationalError:
            print "Could not connect to the MySQL server"
            sys.exit(-5)

        print "Connected to the MySQL server"

        start_time = datetime.datetime.now().replace(hour=0)

        backup = connection.cursor()
        backup.execute("set autocommit=0;")
        backup.execute("flush tables with read lock;")

        print "Creating project snapshot \"MySQL-snapshot\""

        zfs_snapshot()
        backup.execute("unlock tables;")

        finish_time = datetime.datetime.now().replace(hour=0)
        total_time = finish_time - start_time
        print "Completed in ", total_time

    if __name__ == "__main__":
        main()
The blog post serves as a follow-up to Deploying MySQL over NFS using the Oracle ZFS Storage Appliance. The benefits remain the same which means this discussion will focus completely on configuring your Oracle ZFS Storage Appliance and database server.
Configuring the Oracle ZFS Storage Appliance
Depending on which block protocol you plan on using, set up target and initiator groups per the following documentation:
These instructions assume you are using a target and initiator group called 'mysql-tgt' and 'mysql-init'
1. From the ZFS controller’s CLI, create a project called ‘mysql’:
zfs:> shares project mysql
2. Set logbias to latency to leverage write flash capabilities:
        zfs:shares mysql (uncommitted)> set logbias=latency
                               logbias = latency (uncommitted)
3. Commit the settings:
zfs:shares mysql (uncommitted)> commit
4. Select the 'mysql' project:
zfs:> shares select mysql
5. Create a LUN called 'innodb-data' to hold data files:
zfs:shares mysql> lun innodb-data
6. Set the volume block record size to 16K to match Innodb’s standard page size:
        zfs:shares mysql/innodb-data (uncommitted)> set volblocksize=16K
                               volblocksize = 16K (uncommitted)
7. Set the volume size to a value large enough to accommodate your database:
        zfs:shares mysql/innodb-data (uncommitted)> set volsize=1T
                               volsize = 1T (uncommitted)
8. Set the initiator and target groups:
        zfs:shares mysql/innodb-data (uncommitted)> set initiatorgroup=mysql-init
                               initiatorgroup = 1T (uncommitted)
        zfs:shares mysql/innodb-data (uncommitted)> set targetgroup=mysql-tgt
                               initiatorgroup = 1T (uncommitted)
        zfs:shares mysql/innodb-data (uncommitted)> commit
9. Create a LUN called ‘innodb-log’ to hold the redo logs:
zfs:shares mysql> lun innodb-log
10. Set the volume block record size to 128K:
        zfs:shares mysql/innodb-log (uncommitted)> set volblocksize=128K
                               volblocksize = 128K (uncommitted)
11. Set the volume size to a value large enough to accommodate your database:
        zfs:shares mysql/innodb-log (uncommitted)> set volsize=256G
                               volsize = 256G (uncommitted)
        zfs:shares mysql/innodb-log (uncommitted)> commit
Configuring your database server
1. A directory structure should be created to contain the MySQL database:
# mkdir -p /mysql/san/innodb-data
# mkdir -p /mysql/san/innodb-log
# chown -R mysql:mysql /mysql/san
2. If using iSCSI, login to the ZFS Storage Appliance:
# iscsiadm -m discovery -t sendtargets -p zfssa-ip-address
# iscsiadm -m node -p zfssa-ip-address -login
3. The multipath configuration held in /etc/multipath.conf should contain the following:
defaults {
    find_multipaths yes
    user_friendly_names yes
}
devices {
    device {
        vendor "SUN"
        product "ZFS Storage 7430"
        getuid_callout "/lib/udev/scsi_id --page=0x83 --whitelisted --device=/dev/%n"
        prio alua
        hardware_handler "1 alua"
        path_grouping_policy group_by_prio
        failback immediate
        no_path_retry 600
        rr_min_io 100
        path_checker tur
        rr_weight uniform
        features "0"
    }
}
4. Discover the LUNs with multipath. This may require a restart of the multipath service to take in the new configuration changes.
# multipath -ll
mpatha (3600144f0fa2f948b0000537cdb970008) dm-2 SUN,ZFS Storage 7430
size=1.0T features='0' hwhandler='0' wp=rw
|-+- policy='round-robin 0' prio=1 status=active
| `-0:0:0:0 sda 8:0   active ready running
|-+- policy='round-robin 0' prio=1 status=enabled
| `-0:0:1:0 sdc 8:32  active ready running
|-+- policy='round-robin 0' prio=1 status=enabled
| `-1:0:0:0 sde 8:64  active ready running
`-+- policy='round-robin 0' prio=1 status=enabled
  `-1:0:1:0 sdg 8:96  active  ready running
mpathb (3600144f0fa2f948b0000537cdbc10009) dm-3 SUN,ZFS Storage 7430
size=256G features='0' hwhandler='0' wp=rw
|-+- policy='round-robin 0' prio=1 status=active
| `-0:0:0:1 sdb 8:16  active ready running
|-+- policy='round-robin 0' prio=1 status=enabled
| `-0:0:1:1 sdd 8:48  active ready running
|-+- policy='round-robin 0' prio=1 status=enabled
| `-1:0:0:1 sdf 8:80  active ready running
`-+- policy='round-robin 0' prio=1 status=enabled
  `-1:0:1:1 sdh 8:112 active ready running
5. Align each LUN on a 32 byte boundary, specifying multiples of 256 for each partition. This is documented more extensively in Aligning Partitions to Maximize Performance, page 31.
# fdisk -u -S 32 /dev/dm-2
# fdisk -u -S 32 /dev/dm-3
6. Build an XFS filesystem* on top of each LUN for the full device path on the first partition:
# mkfs.xfs /dev/mapper/mpathap1
# mkfs.xfs /dev/mapper/mpathbp1
* XFS is preferred on Linux. ZFS is preferred on Solaris.
7. Mount each LUN either from a shell or automatically from /etc/fstab:
# mount -t xfs -o noatime,nodiratime,nobarrier,logbufs=8,logbsize=256k
 /dev/mapper/mpathap1 /mysql/san/innodb-data
# mount -t xfs -o noatime,nodiratime,nobarrier,logbufs=8,logbsize=256k
 /dev/mapper/mpathbp1 /mysql/san/innodb-log
That's it. Refer to the previous blog post to understand how to setup the MySQL database once these filesystems are mounted. In a future blog post, I'll cover how to backup your MySQL database using snapshots and cloning.
The Oracle ZFS Storage Appliance supports NFS, iSCSI, and Fibre Channel access to a MySQL database. By consolidating the storage of MySQL databases onto the Oracle ZFS Storage Appliance, the following goals can be achieved:
1. Expand and contract storage space easily in a pooled environment.
2. Focus high-end caching on the Oracle ZFS Storage Appliance to simplify provisioning.
3. Eliminate network overhead by leveraging Infiniband and Fibre Channel connectivity.
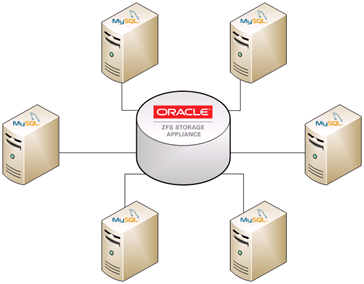
This blog post will focus specifically on NFS. A followup post will discuss iSCSI and Fibre Channel.
Configuring the Oracle ZFS Storage Appliance
Each database should be contained in its own project.
1. From the ZFS controller's CLI, create a project called 'mysql'.
zfs:> shares project mysql
2. Set logbias to latency to leverage write flash capabilities:
        zfs:shares mysql (uncommitted)> set logbias=latency
                               logbias = latency (uncommitted)
3. Set the default user to mysql and default group to mysql:
        zfs:shares mysql (uncommitted)> set default_user=mysql
                          default_user = mysql (uncommitted)
        zfs:shares mysql (uncommitted)> set default_group=mysql
                            default_group = mysql (uncommitted)
Note: If a name service such as LDAP or NIS is not being used, change these to the actual UID and GID found in /etc/passwd and /etc/group on the host.
4. Disable 'Update access time on read':
        zfs:shares mysql> set atime=false
                                 atime = false (uncommitted)
5. Commit the changes:
zfs:shares mysql> commit
6. Create a filesystem called innodb-data to hold data files:
zfs:shares mysql> filesystem innodb-data
7. Set the database record size to 16K to match Innodb's standard page size:
        zfs:shares mysql/innodb-data (uncommitted)> set recordsize=16K
                             recordsize = 16K (uncommitted)
        zfs:shares mysql/innodb-data (uncommitted)> commit
8. Create a filesystem called 'innodb-log' to hold redo logs:
zfs:shares mysql> filesystem innodb-log
9. Set the database record size to 128K:
        zfs:shares mysql/innodb-log (uncommitted)> set recordsize=128K
                            recordsize = 128K (uncommitted)
        zfs:shares mysql/innodb-log (uncommitted)> commit
Configuring the server
This example assumes a Linux server will be running the MySQL database. The following commands are roughly the same for a Solaris machine:
1. A directory structure should be created to contain the MySQL database:
        # mkdir -p /mysql/nas/innodb-data
        # mkdir -p /mysql/nas/innodb-log
        # chown -R mysql:mysql /mysql/nas
2. Each filesystem provisioned on the Oracle ZFS Storage Appliance should be mounted with the following options:
        rw,bg,hard,rsize=1048576,wsize=1048576,vers=3,nointr,timeo=600,tcp,
        actimeo=0,nolock
3. This should be supplied in /etc/fstab in order to be mounted automatically at boot, or it can be run manually from a shell like so:
        # mount -t nfs -o rw,bg,hard,rsize=1048576,wsize=1048576,vers=3,nointr,
          timeo=600,tcp,actimeo=0,nolock zfs:/export/innodb-data /mysql/nas/innodb-data
        # mount -t nfs -o rw,bg,hard,rsize=1048576,wsize=1048576,vers=3,nointr,
          timeo=600,tcp,actimeo=0,nolock zfs:/export/innodb-log /mysql/nas/innodb-log
Configuring the MySQL database
The option file my.cnf should be modified to offload the database onto the Oracle ZFS Storage Appliance and to make additional tunings for optimal performance. Prior to changing this file, MySQL should be stopped and restarted once completed.
    # service mysql stop
    # service mysql start
Important my.cnf changes
1. innodb_doublewrite = 0
A double write buffer is necessary in the event of partial page writes. However, the transactional nature of ZFS guarantees that partial writes will never occur. This can be safely disabled.
2. innodb_flush_method = O_DIRECT
Ensures that InnoDB calls directio() instead of fcntl() for the data files. This allows the data to be accessed without OS level buffering and read-ahead.
3. innodb_data_home_dir = /path/to/innodb-data
The data filesystem for InnoDB should be located on its own share or LUN on the Oracle ZFS Storage Appliance.
4. innodb_log_group_home_dir = /path/to/innodb-log
The log filesystem for InnoDB should be located on its own share or LUN on the Oracle ZFS Storage Appliance.
5. innodb_data_file_path = ibdatafile:1G:autoextend
This configures a single large tablespace for InnoDB. The ZFS controller is then responsible for managing the growth of new data. This eliminates the complexity needed for controlling multiple tablespaces.
You can also download the following example my.cnf file to get started.
Testing with Sysbench
Sysbench is a handy benchmark tool for generating a database workload. To fill a test database, run the following command:
    # sysbench \
    --test=oltp \
    --oltp-table-size=1000000 \
    --mysql-db=test \
    --mysql-user=root \
    --mysql-password= \
    prepare
Once filled, create an OLTP workload with the following command and parameters:
    # sysbench \
    --test=oltp \
    --oltp-table-size=1000000 \
    --oltp-test-mode=complex \
    --oltp-read-only=off \
    --num-threads=128 \
    --max-time=3600 \
    --max-requests=0 \
    --mysql-db=test \
    --mysql-user=root \
    --mysql-password= \
    --mysql-table-engine=innodb \
    run
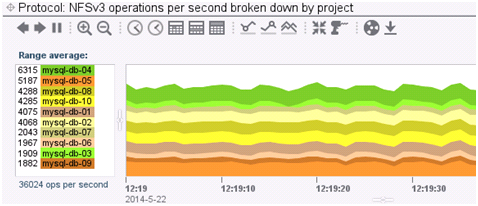
Analytics
The Analytics feature of the Oracle ZFS Storage Appliance offers an unprecedented level of observability into your database workload. This can assist in identifying performance bottlenecks based on the utilization of your network, hardware, and storage protocols. Its drill-down functionality can also narrow the focus of a MySQL instance into a workload’s operation type (read/write), I/O pattern (sequential / random), response latency, and I/O size for both the data and log files. At any point in time, a DBA can track a database instance at an incredibly granular level.
Once you have a single database installed, you can try creating more instances to analyze your I/O patterns. Run separate sysbench processes for each database and then use Analytics to monitor the differences between workloads.